
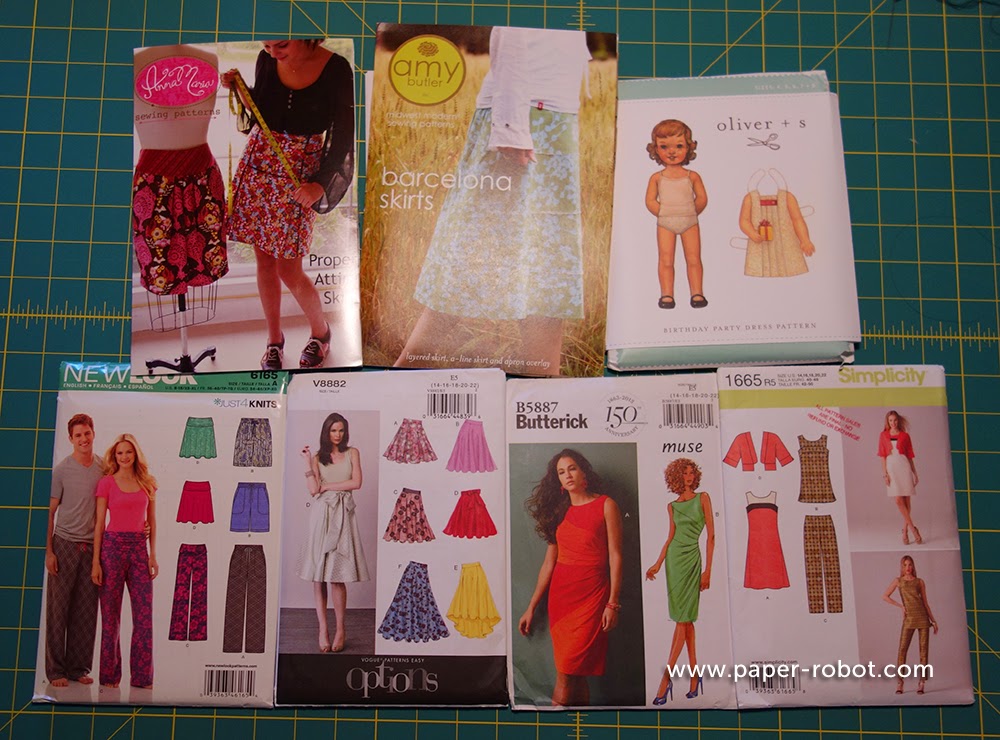
There are many pattern houses (like publishing houses), but there are four large brands: Simplicity, and McCall, Butterick, and Vogue. Although McCall owns Butterick and Vogue, the patterns and styles are very different. There are many other smaller brands, like Burda, or independent designers, like Amy Butler, who produce and sell their own patterns.
Despite the differences between each company, if you can understand how to use one pattern, you should have little difficulty with the others. In this post, I won't be touching fabric or my sewing machine at all, but instead going through what you should pay attention to when you're choosing a pattern. You must choose, but choose wisely.
It can be tempting to just go out and buy a pattern that looks good, and start making it, but it can help a lot to know a few things before you jump right in. Or, jump right in, whatever. Learn from your mistakes, right? Right! GO GO GO!
OK, now that those guys are gone, let's you and I have a talk about your style. It's important to be aware of what sorts of clothes you like, and what works for you. The last thing you want to do is spend hours working on something, only to realize partway through that you hate it. So be conscious of your fit and your taste, and pick the right materials, too--garbage in, garbage out.
Finding the right style is very easy!
Do a little bit of online shopping to find styles that you like. Brave the crowds and salespeople at your local mall, and try on things that appeal to you. Take note of things that work for you. Here's an example list of structural things to note; keep in mind that this is not exhaustive!
Do a little bit of online shopping to find styles that you like. Brave the crowds and salespeople at your local mall, and try on things that appeal to you. Take note of things that work for you. Here's an example list of structural things to note; keep in mind that this is not exhaustive!
- Neckband: high, low, crew-cut, v-neck?
- Sleeves/shoulders: set-in, puff, raglan, dropped?
- Sleeves: long, short, three-quarters, sleeveless, cuffed, peasant?
- Torso: tight, loose, just right?
- Waistline: high/empire, natural, dropped?
- Waistband: elastic, fly/mock fly?
- Skirt: a-line, bias, mermaid, tapered?
- Pants: straight, bootcut, narrow, cuffed?
Take a look at the fabric that was used, since that often has a significant impact on structural details. For example, a skirt with an elastic waist might sit flat on the body if the material is super stretchy knit, or it might have pleats and gathers if it's made with a non-stretchy material, which means that there is extra bulk below the waist.

Once you figure out some styles that you like, then it's time to find the right fit.
Pattern envelopes generally have only some of the available sizes, so you have to be sure you're buying the right one. Keep in mind that sewing pattern sizing is very different from US clothing sizes. Don't be alarmed if you generally wear size 10, but you actually measure as size 14 in the pattern!
Get a soft measuring tape, a pen, and a piece of paper. It helps to have a friend measure you, too, since they'll be able to see how straight your measuring tape is. If you don't have a flexible measuring tape, a piece of string will do in a pinch--wrap it around the body part you're measuring, then mark it where the ends cross over, then measure between those points.
Butterick has some great instructions on how to take your body measurements.
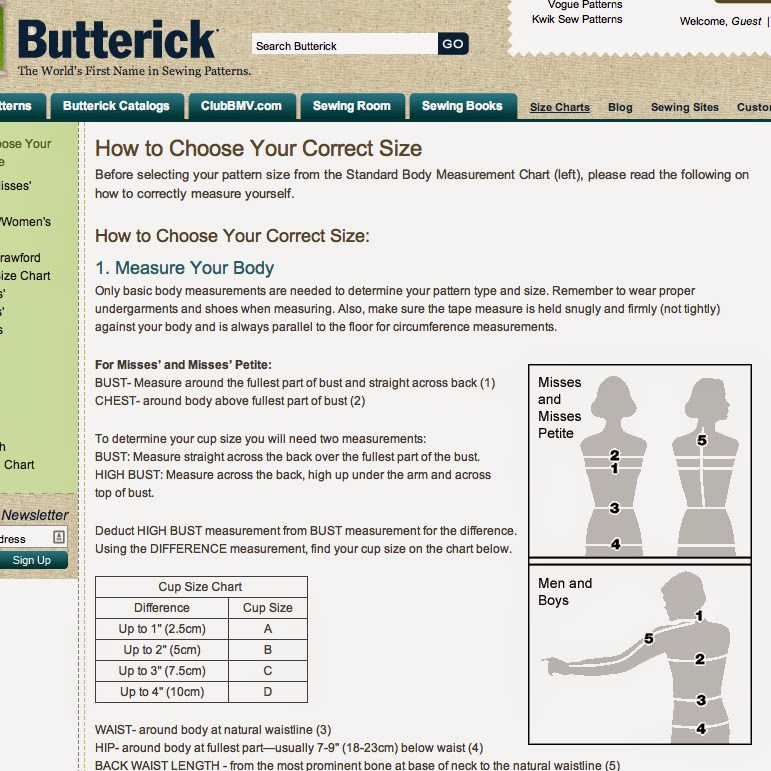
At the very least, you'll want to get your bust (chest), waist, and hip measurements. Your back waist length (from your neck to your waist, along your back) will be important if you are going to do fitted jackets and tops. Bottoms (pants, skirts, and shorts) are based off of waist and hip measurements, but if you are petite (generally 5'3" and under) you will want to be aware of leg lengths.
Pattern companies may have different size charts, so you'll want to take a look at where your measurements fit in. If you are between sizes, use your best judgement for which one to make, but it isn't too difficult to alter the pattern slightly before you actually start sewing.
Butterick's size chart is in that link above, and here is the one for Simplicity.
Pattern envelopes generally have only some of the available sizes, so you have to be sure you're buying the right one. Keep in mind that sewing pattern sizing is very different from US clothing sizes. Don't be alarmed if you generally wear size 10, but you actually measure as size 14 in the pattern!
Get a soft measuring tape, a pen, and a piece of paper. It helps to have a friend measure you, too, since they'll be able to see how straight your measuring tape is. If you don't have a flexible measuring tape, a piece of string will do in a pinch--wrap it around the body part you're measuring, then mark it where the ends cross over, then measure between those points.
Butterick has some great instructions on how to take your body measurements.
At the very least, you'll want to get your bust (chest), waist, and hip measurements. Your back waist length (from your neck to your waist, along your back) will be important if you are going to do fitted jackets and tops. Bottoms (pants, skirts, and shorts) are based off of waist and hip measurements, but if you are petite (generally 5'3" and under) you will want to be aware of leg lengths.
Pattern companies may have different size charts, so you'll want to take a look at where your measurements fit in. If you are between sizes, use your best judgement for which one to make, but it isn't too difficult to alter the pattern slightly before you actually start sewing.
Butterick's size chart is in that link above, and here is the one for Simplicity.
Now that you have your measurements, it's time to look at those patterns!
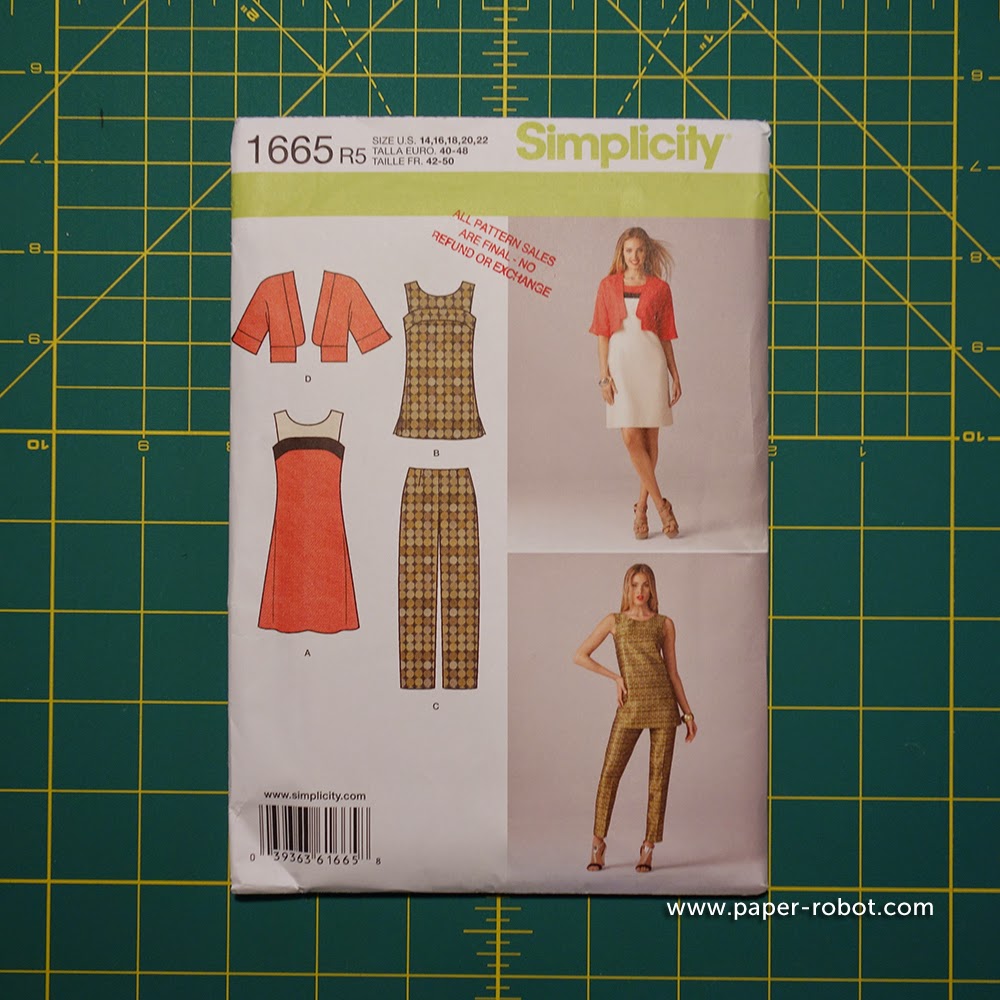
You can go to your local fabric store, but you can also browse patterns online. The pattern that I'm looking at now is Simplicity 1665. Feel free to open this in a new tab if you want to explore!
There's a photograph of the front above, and you can see the front view of the different patterns in that envelope. This pattern comes with a bolero, a dress, a tank top, and a pair of pants, which are each given a letter. I'm interested in the dress, which is View A.
The back of the envelope has everything you need to get.

1. (In red, to the left.) Back view of the pattern. This is where you can see a little bit about the construction, like where a zipper might be placed, if there are darts or slits, and other fun things.
2. (In orange, at the top.) Suggested fabric to use. Fabric affects drape and construction, like I've mentioned before, but patterns like these take a bit of the guesswork out of it. Note: laundered cottons means pre-washed cotton. I'm so used to washing my fabric when I bring it home, though, that it seems kind of odd to call it out, but this is pretty common.
3. (In yellow.) Notions to get. Do you need a zipper? Buttons? Elastic? The pattern will tell you this here. Match it up with your project--for View A, I'm going to need a 16" zipper, and a hook and eye.
4. (In green.) Body and size measurements, which you should be familiar with after measuring yourself.
5. (In blue.) Fabric amounts so you know how much to buy. Pattern pieces change a bit according to size, which means that different amount of fabric will be needed accordingly. They tend to account for a little bit of extra fabric, just in case, but unless you're feeling adventurous, stick with the suggested amount.
You'll notice that they give measurements for fabrics which are 45" and 60" wide, which are fairly standard widths. If your fabric is less than 45", get a little extra. If your fabric is less than 60" wide, go with the 45" amounts.
There are also other lines that says "Contrast Yoke" and "Contrast Band." If you look again at View A, you'll notice that the shoulders (the yoke) and underneath (the band) are different from the pink of the rest of the dress. These are the contrast fabrics, and will be listed separately. Generally these are smaller pieces, so it won't matter as much if you get 45" or 60" wide fabric.
The last thing to notice here is the interfacing. Interfacing is slightly stiffer, generally non-woven fabric, which is attached to the fabric, either by sewing or iron-activated adhesive, before the pieces are sewn together. Interfacing provides support to the garment in key areas, like the button placket on a jacket, or for a crisp collar.
6. (In purple, at the bottom.) Last but not least, finished garment measurements are listed at the bottom. This is how your project will measure up when you've finished it. Unless you're sewing very stretchy knits, you will usually find that the garment is larger than your actual measurements, because there is added ease. Ease is the extra space between you and your clothes, which allow you to put your clothes on, move comfortably, and breathe while you're wearing your clothes. For items like pants (View C in this pattern) it will also tell you how long the pant leg will be. If it's too long (you can measure a pair of pants that fit well), then you might consider shortening them.
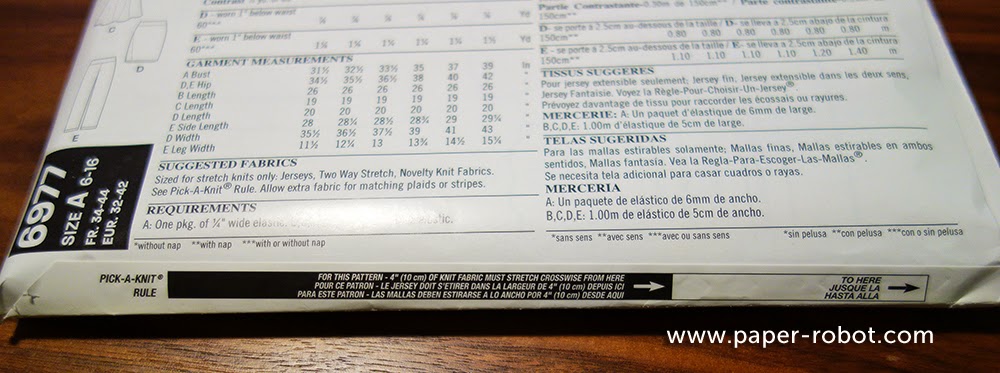
Patterns that are intended for knit fabrics will generally have some kind of pick-a-knit type tool, like the one above. When I talked about knit fabrics before, I explained how to determine the percentage of stretch a knit fabric has. The pick-a-knit tool will do that work for you. Take the fabric you're considering using, and put it up against the envelope, so that it is parallel to the crosswise grain (the weft). Pinch at the ends of that black bar, then start stretching. If you can reach the end of the white bar (to the right) with no distortion in the fabric, then your fabric is right for this pattern. If not, then time to find something else!
You can go to your local fabric store, but you can also browse patterns online. The pattern that I'm looking at now is Simplicity 1665. Feel free to open this in a new tab if you want to explore!
There's a photograph of the front above, and you can see the front view of the different patterns in that envelope. This pattern comes with a bolero, a dress, a tank top, and a pair of pants, which are each given a letter. I'm interested in the dress, which is View A.
The back of the envelope has everything you need to get.
1. (In red, to the left.) Back view of the pattern. This is where you can see a little bit about the construction, like where a zipper might be placed, if there are darts or slits, and other fun things.
2. (In orange, at the top.) Suggested fabric to use. Fabric affects drape and construction, like I've mentioned before, but patterns like these take a bit of the guesswork out of it. Note: laundered cottons means pre-washed cotton. I'm so used to washing my fabric when I bring it home, though, that it seems kind of odd to call it out, but this is pretty common.
3. (In yellow.) Notions to get. Do you need a zipper? Buttons? Elastic? The pattern will tell you this here. Match it up with your project--for View A, I'm going to need a 16" zipper, and a hook and eye.
4. (In green.) Body and size measurements, which you should be familiar with after measuring yourself.
5. (In blue.) Fabric amounts so you know how much to buy. Pattern pieces change a bit according to size, which means that different amount of fabric will be needed accordingly. They tend to account for a little bit of extra fabric, just in case, but unless you're feeling adventurous, stick with the suggested amount.
You'll notice that they give measurements for fabrics which are 45" and 60" wide, which are fairly standard widths. If your fabric is less than 45", get a little extra. If your fabric is less than 60" wide, go with the 45" amounts.
There are also other lines that says "Contrast Yoke" and "Contrast Band." If you look again at View A, you'll notice that the shoulders (the yoke) and underneath (the band) are different from the pink of the rest of the dress. These are the contrast fabrics, and will be listed separately. Generally these are smaller pieces, so it won't matter as much if you get 45" or 60" wide fabric.
The last thing to notice here is the interfacing. Interfacing is slightly stiffer, generally non-woven fabric, which is attached to the fabric, either by sewing or iron-activated adhesive, before the pieces are sewn together. Interfacing provides support to the garment in key areas, like the button placket on a jacket, or for a crisp collar.
6. (In purple, at the bottom.) Last but not least, finished garment measurements are listed at the bottom. This is how your project will measure up when you've finished it. Unless you're sewing very stretchy knits, you will usually find that the garment is larger than your actual measurements, because there is added ease. Ease is the extra space between you and your clothes, which allow you to put your clothes on, move comfortably, and breathe while you're wearing your clothes. For items like pants (View C in this pattern) it will also tell you how long the pant leg will be. If it's too long (you can measure a pair of pants that fit well), then you might consider shortening them.
Patterns that are intended for knit fabrics will generally have some kind of pick-a-knit type tool, like the one above. When I talked about knit fabrics before, I explained how to determine the percentage of stretch a knit fabric has. The pick-a-knit tool will do that work for you. Take the fabric you're considering using, and put it up against the envelope, so that it is parallel to the crosswise grain (the weft). Pinch at the ends of that black bar, then start stretching. If you can reach the end of the white bar (to the right) with no distortion in the fabric, then your fabric is right for this pattern. If not, then time to find something else!
And that's it! There are your three easy steps for choosing the right pattern to sew:
- Know your style,
- Measure yourself, and
- Read the back of the envelope.
Once you're comfortable with reading a pattern back for one company, check out some others. You'll find that all the information you need to know is there, though it may be laid out differently.
Next week I will be playing with fabric, and I'll start going through my own sewing project by placing the pattern pieces and cutting them!
No comments:
Post a Comment