Wednesday, November 18, 2015

Illustration: Polka dot sweater and feather dress

I just finished this illustration:


Although by "finished," I actually mean "I stopped myself from adding any more to it before I ruined it." I am by no means a real artist! I am fairly happy with what I've been turning out for this class, but it takes a lot of practice and fixing to get it that way.

This assignment was a fashion drawing using only pencil crayon, illustrating clothing with pattern and/or texture. Check out my process!

Friday, September 25, 2015

Illustration: Legs and Faces

I'm doing a bit of catch-up with posting, since the first month of classes has completely thrown off my blogging schedule. I haven't sewn anything since the last wedding we went to, but hopefully I can rectify that next week, before the next onslaught of assignments and exams starts up in mid-October.


Here are a bunch of photographs of the better attempts in my work, over the past two weeks, where we focussed on legs, and then faces.

Wednesday, September 23, 2015

Dart Manipulations

Dart manipulation is magical. Using a basic sloper or master pattern, you can do all sorts of things to the placement of each dart, which completely changes the look of the garment without changing the overall fit. Even a simple change can let you do something like this:


We've been doing these basic dart manipulations in my flat pattern class for the past few weeks, on paper. And if it isn't obvious from this blog's name, I'm a big fan of starting out on paper, whether it's a paper prototype for your interface design, or learning about textile weaves.

The dart manipulation above is the one I'm about to show you in this post, where we add the side seam dart into the waist seam dart, to create one bigger, combined dart.

Friday, September 18, 2015

Fashion Illustration - Stick Figures

One of the classes I'm taking this fall is fashion illustration, which is turning out to be much more fun than I expected. I really can't draw to save my life, never mind drawing people! So it was a relief to learn that we would be starting out drawing stick fashion figures:


Far from being basic stick figures, though, there is a bit of a proportion and height formula which makes it easy to follow. Understanding that each line represents a basic bone structure also helps.


Occasionally, adding props and a martini spices up class drawing time a little. :)


It's amazing how much you can get out of just a few well proportioned lines!

The next step has been to start "blocking" our stick figures, or adding a bit of muscle to our bony ladies.


"Runway model." Hahaha.


Some of these drawings are actually based on fashion models, but most are strictly out of my imagination. You can see various notes that I've taken along the way; if you're wondering about this last lady and the wall of text between her legs, I was jotting down some pointers my instructor had for her crotch and thigh placement.

The next things we are working on are developing our leg drawing skills and faces. I've had a lot of difficulty blocking out feet, so this is going to be a slog.

Monday, August 24, 2015

Fashion School & Project Planning

I've been very busy over the past weeks, but my future months are going to be even more hectic, since as of last week I've started a fashion design program! I'm officially a student at CaƱada College, and I've got a full-time schedule, working towards a certificate in their technical oriented apparel program.

Although this means most of my sewing in the near future will be focused on coursework, I have set aside time to work on outfits for two weddings, and have started to plan out a queue for personal projects, which I'm going to share with you now!

I often fall in love with prints that are on plain woven cotton fabric. While they don't always have the crispness associated with quilting cotton, they aren't too far off, which greatly affects the ability of the fabric to drape properly. So many of my patterns work best with fluid, lightweight fabrics, so I went on a quest a while back to find patterns more suitable for these cottons, and paired up some patterns with fabrics.

1. McCalls M7085

This first one is actually finished. And I hate it.

Tuesday, August 18, 2015

Recent Travels

At the end of July, we spent a little over a week visiting with our family on Vancouver Island–in particular, this little munchkin:


There is no sewing in this post, just a few photographs!

Friday, July 24, 2015

East Bay Yarn Crawl

Last Saturday, Molly and I joined an East Bay yarn crawl, and visited four shops in one day! While it was far more laid back than a visit to Stitches West, it was still quite a journey, and I took many photographs along the way. Most of them look like this:


This post should probably actually be called, "Photographs of Molly in craft shops."

Tuesday, July 14, 2015

Puppy Hat

My manager is going on maternity leave starting next week, and a while ago I had promised to make her a puppy hat for the baby boy she will be meeting soon.


Right now, her only baby is her own dog, Scruffy; I tried to match his white colouring and very dark eyes, but I am no dog expert.

Saturday, July 4, 2015

Easy Paper Garland

A very long time ago, I posted this short bit about sewing on paper, but yesterday I made a paper garland for our long weekend BBQ celebrations, and took a bunch of photos along the way.

I made this one out of red and white papers and stuck a bright blue square in the middle, to celebrate both Canada Day and Independence Day!


This is a super easy project, though it does require some time, depending on how large you want to make it. You can use any paper, really, even printer paper, but decorative scrapbook paper or cardstock is more durable.

Difficulty level: Easy
Time commitment: 1-2 hours

Materials:

  • Paper (I used 6 sheets of 12"x12" cardstock)
  • Ruler
  • Scissors or paper punch
  • Matching thread


Sunday, June 28, 2015

Stripe Study Shawl

An office reorganization has left my sewing equipment in a pile, ready to be set up again, but in the meanwhile I've finally had a chance to finish this shawl I've been working on since March.


The pattern is Veera VƤlimƤki's large triangular Stripe Study shawl, and I used Miss Bab's Yummy 2-ply, which I had picked up at Stitches West this year.

Sunday, June 14, 2015

Knots of Love

This weekend I had a chance to make two hats for Knots of Love, a charity which collects and distributes handmade chemo caps and hats to those undergoing chemotherapy or facing other illnesses. I meant to make one, but crochet goes so quickly that I ended up doing two!


Thursday, June 11, 2015

Rolled Hem via Serger

A rolled hem done with a serger or overlock machine is just about the easiest thing ever. Fancier machines will have the setting built in, and all it takes is a flip of a dial. Older machines with manual tension control will need a little more work, but it's still doable if you understand the theory of it!


Rolled hems are great for napkin edges, kitchen linens, skirt hems, and scarves, just to name a few examples. Once you've seen them, you can't help but notice them on many store-bought items.

Sunday, May 31, 2015

Hidden Magnetic Purse Closure

I had an idea late last night on how to make a hidden magnetic purse closure. I didn't want to use sew-in ones (bleh, too much work for a quick tote bag project), and the more typical magnetic clasps require extra reinforcement for the metal pieces that go through the fabric.


On our fridge, we have a bunch of Mighty Magnets*, which are ridiculously strong for their size, and extremely effective. I was thinking it would be easy to slip them into a little fabric pocket, sew that into my bag with a machine, and voila! Hidden magnetic purse closure. Check out this super simple tutorial!

Wednesday, May 20, 2015

yardage.info

I routinely find myself in fabric stores, ogling yards of bolts of fabric, and more often than not will buy some without a clear idea of a project. I used to buy just one yard, but then through practice, found that one yard wasn't enough for a lot of the projects I wanted to make. Now I'm up to 1.5 or 2 yards, depending on the cost.

Last year, I had an idea for a little web application where one could estimate how much fabric would be necessary to do different projects–an on-the-go fabric shopping aid, if you will. I registered a domain and never really got around to building anything until this past weekend.

You can find it at yardage.info.

Isn't that a cute domain name?


You can select different categories, and various project characteristics will pop up to give a slightly more accurate estimate. Right now it's heavily focused on women's clothing; eventually I'd like to include menswear and accessories.

Wednesday, May 13, 2015

UFOs and WIPs and queues

I meant to write a post for today about rolled hems, as I took some related photographs a while ago... but got completely sidetracked by minor disagreement I had with my serger, which is still unresolved. I feel that the needle threads ought to be catching all of the lower loops, yet my serger seems to be of the opinion that it can avoid catching every tenth loop or so.

I am confident I will prevail, if only because a full cleaning and rethreading is going to happen, and soon.


In the meanwhile, I thought I might post some pictures of recent and current projects, because as a true crafter, I never have just one!

Friday, May 8, 2015

Stonemountain and Daughter

I lived in Berkeley for two years, and somehow never was able to get my butt over to Stonemountain and Daughter. In my defence, we were never really set up for me to sew while I was doing my degree, but now I really regret not going!


I finally had reason to go last week, and took a few photographs while I was there.

Wednesday, May 6, 2015

Basic Hem 2: Knit Boogaloo

Continuing the theme of basic hemming, here's some photographs from a tunic I made using some very cute two-way stretch fabric.


Knits don't really unravel like woven fabrics do, so you can often get away with not hemming them. But that doesn't mean you should–hemming will give your garment a nice, clean edge, and in many cases may look better than your best effort to cut a straight line.

Wednesday, April 29, 2015

Basic Hemming

Hems! What are they good for? Absolutely most things!

I'm pretty sure those are the actual lyrics of the song. No? OK they aren't. But hems are great, not just for garments, but for just about anything that isn't being turned out.


You probably know how to do a basic hem, but in case you want to see pictures and don't want to use bias binding, here's how you can add one so your edges don't unravel.

Sunday, April 26, 2015

Pincushion Tutorial

I've been wanting a new pincushion for a while, and I realized I could repurpose a jar very easily to suit my needs. So here's a simple, 10-minute craft that requires no sewing whatsoever, but yields one very cute pincushion!


Supplies:

  • one 4 oz wide-mouth canning jar
  • 5"-6" diameter circular piece of fabric
  • polyester fiberfill

Wednesday, April 15, 2015

Dressform WIP

Last week, I ordered a Dritz dressform and a Fabulous Fit foam package. I've attempted a few times to size her up properly, and each time there is the smallest improvement. This is her in her current glory:


She's wearing one of my tightest fitting dresses to test out her shape. So far, I am not satisfied, but it's getting better.

Wednesday, April 8, 2015

Finish with Bias Binding

Back in February, I made this lace and knit top, which turned out really well. I used bias tape to finish the neck opening, sleeves, and hem, but took a bunch of photos during the process, so I could turn it into a tutorial eventually.


Bias tape is, as the name suggests, cut on the bias, which gives it that tiny bit of stretch. (Last year when I started this blag, I wrote briefly about bias.) That stretchiness allows bias tape to bend to different curves in sewing, which makes it ideal for finishing all sorts of edges.

Wednesday, April 1, 2015

Da Roma!

I haven't had time to sew in the last couple of weeks, because one week, we were getting ready to go to Rome, and then the following week, we were in Rome! We had a fantastic trip, mostly in Rome with one daytrip to Pompeii, celebrating all sorts of birthdays.


But of course, what trip could I take without buying some fabric? After all, we were in Italy. I managed to hit two negozi di tessuti, and came back with a fairly restrained number: only three cuts of silk.

Tuesday, March 24, 2015

Scraps

What do you do with your scraps? I always have a difficult time parting with the scrap fabric left over from projects. I know most of it isn't usable, but still I can't bring myself to just toss them out.


I like to imagine, though I have no idea if it's true, that quilting was originally born out of saving scraps like these to sew into blankets.  So several years ago, I started cutting the scraps down into little squares, so I could eventually do just that. I did this recently with the leftovers from my Sherlock skirt test, and this is my process!

Sunday, March 15, 2015

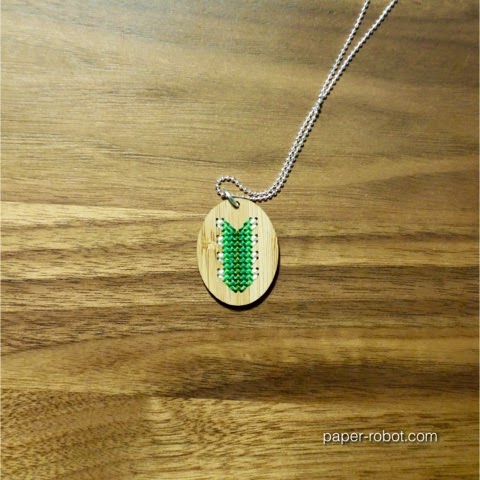
Cross Stitch Pendant

I just finished this cross-stitch pendant, which I did in a little green gradient arrow pattern.


This has been in my queue for a while. I use the word "queue" lightly, because although there are a lot of projects I have to do, I don't finish them in any kind of orderly fashion.

Monday, March 9, 2015

Blind Hem Tutorial

This is the real reason I brought out that blind hem foot last week: at 5'1", it's hard to find clothes that fit me properly, and I end up having to shorten things a lot. A standard hem isn't too hard, but for certain garments, a blind hem is just the ticket. 


In this post, I've documented my process for hemming pants, but you can do a blind hem for skirts and shirts, too. You could probably even do them for sleeves, though I don't know if I've seen that done. You don't even need to have a height problem to need to hem things–maybe you just want ankle-length pants, or a shorter skirt.

Tuesday, March 3, 2015

Blind Hem foot

To be quite honest, I don't think I've ever used a blind hem foot for anything besides doing a blind hem, so my mileage with this one is quite low. But most machines come with a blind hem foot or attachment, and it can be very useful for–you guessed it–hemming!


In this post, I'll demonstrate the basics of using a blind hem foot. In next week's post, I'll show how to hem a pair of pants using the foot, as well.

But wait! What is a blind hem, anyway?

Wednesday, February 25, 2015

Stitches West 2015

Every year for the last four, I've gone to Stitches West, which is described on their FAQ as a "fiber experience" but is really just a huge yarn/knitting/crochet/weaving/spinning/etc. convention. Usually I come back with a huge bag of yarn and various associated sundries. This year was no exception!


This year the only yarn I got was some lace from Sincere Sheep, and some 2-ply and worsted from Miss Babs. I also picked up some cool knit blockers from Knitter's Pride, a shawl pin, and surprisingly, some sewing pins.

Saturday, February 21, 2015

Knit & Lace Top

Last year, I wrote about this shirt I made for the guys of Electroloom, using parts of Vogue pattern V8877. When I did that, I used pattern tracing paper like I normally do, and was able to trim it down a bit to make a top for myself.


This pattern is extremely easy, with just four pieces. I did a lot of altering after the initial construction–I didn't alter the pattern that I made for Aaron, erring on the side of having too much seam allowance. This would be fine, except I also didn't take into consideration that it's already a very, very loose pattern.

Tuesday, February 17, 2015

Self Enclosed Seams

Last week I demonstrated the French seam, but while looking through my books for descriptions of how to do them properly, I discovered two other ways to enclose seams.


I've never tried these in projects, but thought a good place to start would be some scrap samples, which I photographed to put up here.

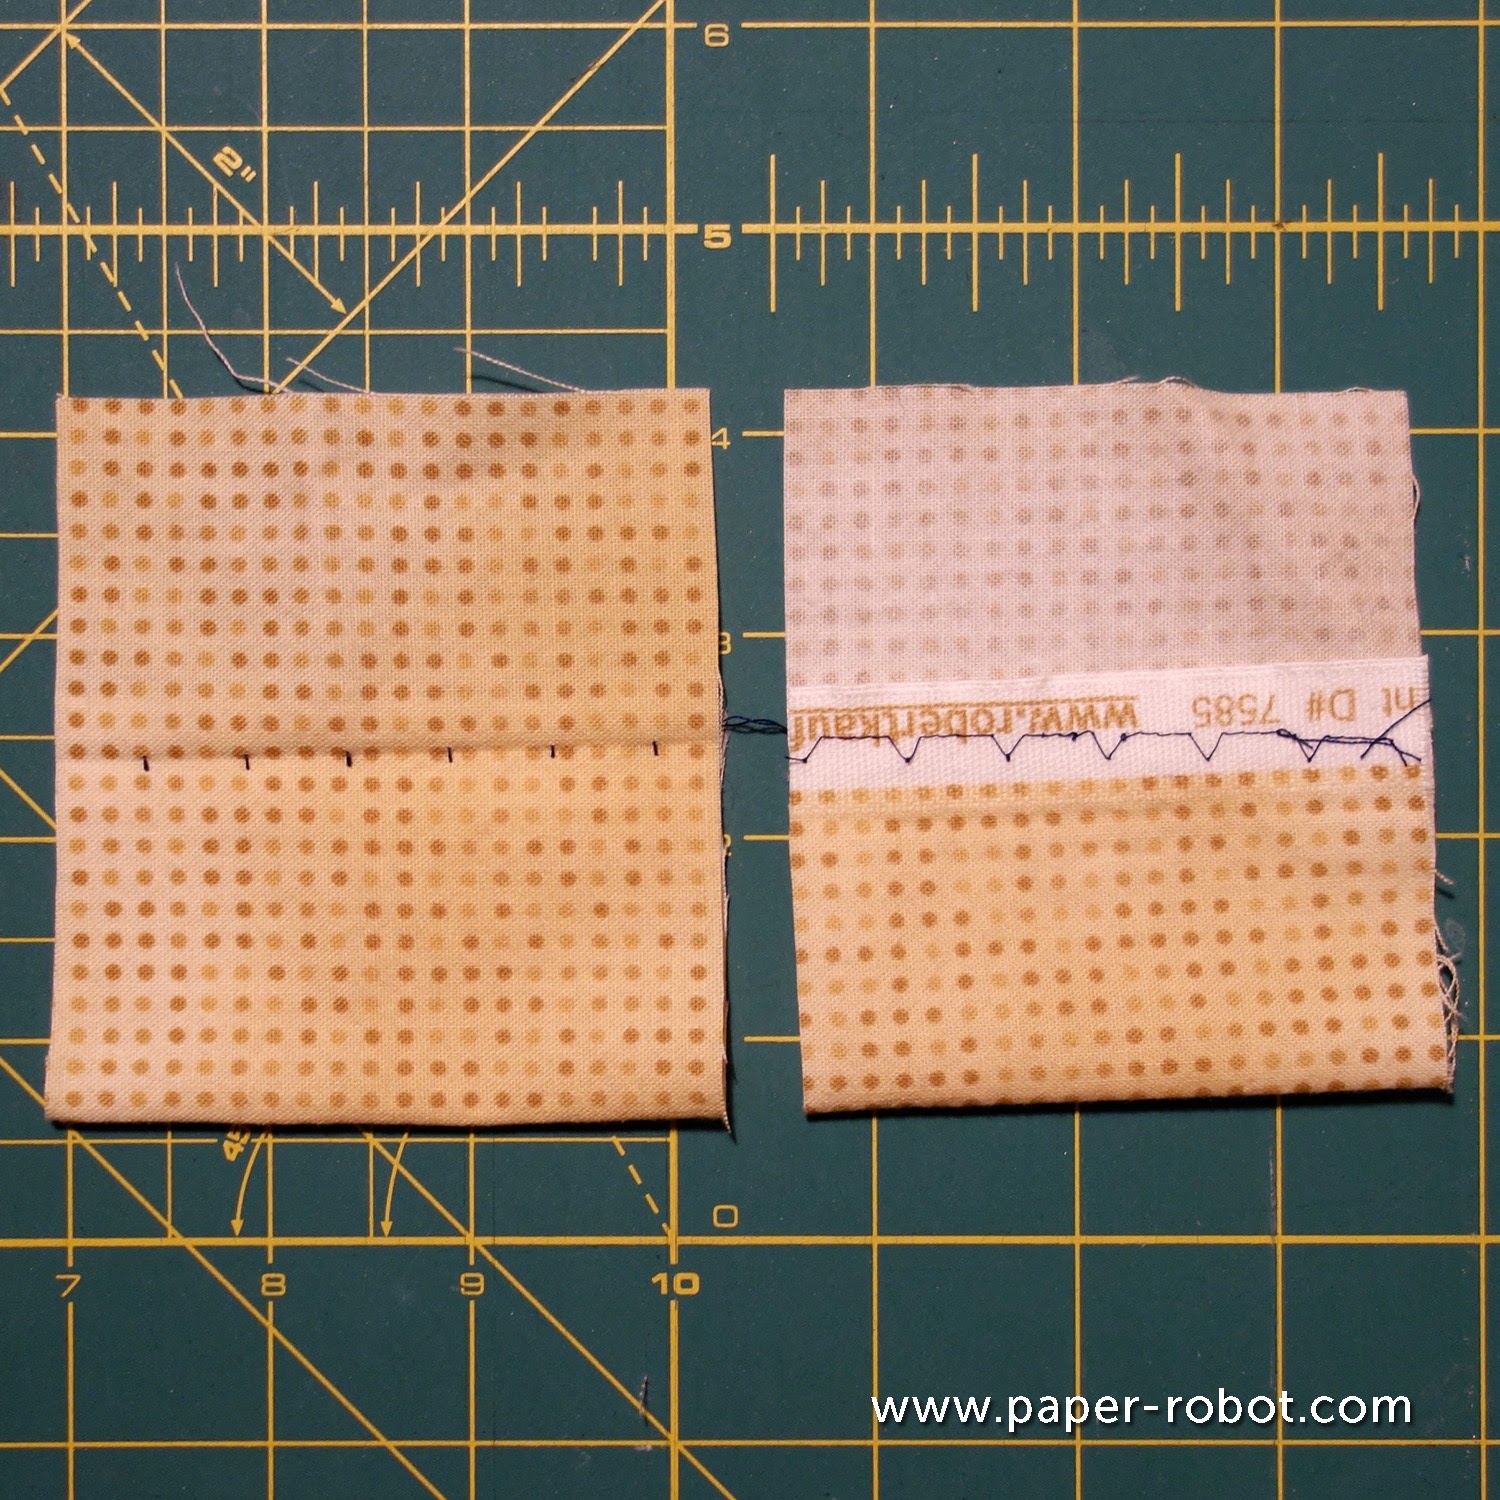
The picture above has a flat-felled seam on the left, and a self-bound seam on the right. They're very similar in construction, but some small details create a very different effect.

Tuesday, February 10, 2015

French Seams

I've written about finishing seams before, but since I used a French seam on my camisole last week, I wanted to take the opportunity to write about some more advanced seaming techniques.


French seams take a little bit of thinking, but they're very neat! You can use them for most, but not all, garment construction, and the bound seam allowances give your finished product a classy, couture feel.

In this post, I'll show you how to do a French seam, as well as its sister, the mock French seam.

Wednesday, February 4, 2015

Silk Camisole

This is neither a Blag-a-Bag nor my typical Technical Tuesday post, but I've started a new job this week and have yet to figure out an ideal schedule. But I have managed to find a very little bit of time between getting oriented at work and trying to learn Italian, to do a little bit of sewing!


This is a simple camisole from Simplicity 1366, made using some blue silk charmeuse I picked up last year at Britex.

Tuesday, January 27, 2015

A Different Way to Sew Darts

Last week I demonstrated the basic way to sew a dart, but I picked up The Dressmaker's Handbook of Couture Sewing Techniques, by Lynda Maynard. I haven't gone through all of it, but I did discover a new way to sew darts.


It's a little finicky, but very cool, and makes for a very neat, very crisp dart, and most of the process is very similar.

Friday, January 23, 2015

Blag-a-Bag: Using Patterns

Normally when I post a Blag-a-Bag, it's something that I've designed myself, or based off of a design that I've seen. This week is a little different, however: I figured it was time I followed a pattern.


Tuesday, January 20, 2015

How to Sew Darts

Darts are pretty common in clothing construction, and serve to give flat pattern pieces enough curve to give a garment some shape. You can usually find darts at the tops of pants, shorts, and skirts, just under the waistband (if it isn't elastic), and sometimes in the middle of shirts and dresses, too!


Darts can seem a little complicated to sew, but are actually quite straightforward. In this post, I'll show you how to sew a basic dart in five steps, using photographs I took while making my Sherlock Skirt test run.

Friday, January 16, 2015

Blag-a-Bag: Lined Zip Pouch

Last year, I posted about going to FabMo, and showed some pouches that I made with the upcycled fabric. This week's blag-a-bag is an improved version, with a silky-soft liner and handy loops on either side.


Tuesday, January 13, 2015

Stitch Ripping

Ripping out stitches is a huge drag, but sometimes it just has to be done, whether it's to undo a mistake, move a seam, or save a piece of fabric for a new project!


In this post, I'll show you my favourite way of removing stitches, which is fairly quick, clean, and limits potential damage to the fabric.

Friday, January 9, 2015

Blag-a-Bag: 2015!

Happy new year! It was a slow start after a long vacation with family, but once the fridge was full and the clothes were clean(er), it was time to make a new bag.