On our fridge, we have a bunch of Mighty Magnets*, which are ridiculously strong for their size, and extremely effective. I was thinking it would be easy to slip them into a little fabric pocket, sew that into my bag with a machine, and voila! Hidden magnetic purse closure. Check out this super simple tutorial!
*Note: most of the links on this post are Amazon affiliate links. I receive a 4% Amazon credit for any associated purchase you make. Please click! I only recommend products that I have used and recommend.
I've been disgustingly sick all week with a cold, so most of my free time has been spent sleeping. But Friday night I had a burst of energy and decided it was time to start clearing out one of the literal piles of fabrics. I've got a stack of tote bags ready to be sewn together, made from larger designer samples I've picked up at various FabMo events.
By adding a lining and keeping the bottom of the lining open, it was really easy to attach a pair of magnets. Very little work is required in doing this!
You will need:
- A pair of strong magnets, or one strong magnet and a ferromagnetic object that doesn't have sharp edges (e.g., a plain steel disc or washer, although I haven't tested that)
- Scrap fabric
- Glue
(I recommend Aleene's Tacky Glue, but I just used Mod Podge for this, since it's what I had around today.)
These are the magnets I used; they aren't the super strong type, but aren't too bad. I didn't want to sacrifice my really nice magnets on a prototype, and these random magnets (from Radio Shack!), proved to be sufficient, after a quick test with several layers of folded fabric.
1. Prepare fabric pockets
To make the fabric pockets, cut a strip of fabric approximately 2"x8". Fold the strip in half, so that you have a 2"x4" folded piece, and sew along the open edges. You should end up with a completely enclosed rectangle, like the one in the middle of this photo:
Next, cut the rectangle in half, so that you end up with two small pouches, each with one open ended. If you want, use Fray Block to seal the edges.
2. Insert magnet
Slip one of the magnets into the pouch, then stuff a little bit of glue onto one side, spreading it around a bit. This is to keep the magnet from moving around too much.
The glue is especially important if you're using two magnets; while I was looking up ideas for hidden magnetic clasps, I found a random forum post which mentioned the possibility of the magnets moving such that the poles repulsed, rather than attracted, one another. This is not ideal in a closure, so the glue helps to prevent too much movement. You could also sew close to the magnet.
Mark the side that is glued, using a normal pen.
Put the other magnet in your other pouch, and let it attach naturally to the unglued side of your first. Mark the outside of that pouch, and glue the magnet down on that side. This is so that the polarity matches properly.
Obviously you can skip all the glueing if you're using one magnet and a piece of metal. Just slip each into a pouch, and attach them to the bag. Using a round (or rounded) piece of metal will prevent them from poking holes through your fabric (also a recommendation from a random forum post).
3. Attach the magnets
While the glue sets, you can find the right place on your bag. You will want to use a bag design that allows easy access to the place you want these magnets, or else to plan ahead in attaching them.
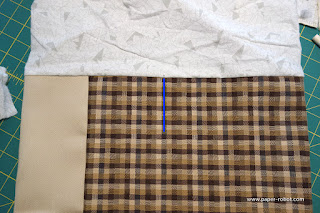
In this case, I wanted to place the magnets in the center of the bag, which I marked with a pin:
Pin it to the selvage, on the wrong side of your fabric. A quick sew-in is all you need! You can tell I mostly only used my serger for this project.
Once you've turned your bag, the magnet will just work.
Ta-da!
Close up your lining, attach your straps, and you're good to go!
Since this has worked out, but I have about 10 tote bags I want to make, and I need to get more magnets! I'm still not sure how I want to do straps for these bags, but my goal is to have them on Etsy before mid-June!


Clever idea, so simple and effective
ReplyDeleteThanks, Sandra! :)
Deletenice bag. I like it, Thanks for sharing such a useful post.
ReplyDeletenon woven bags machine