
Sometimes called the stitch in the ditch foot, the edge stitch foot is by far one of my favourites. I mostly use it for edge stitching (yes, really) to finish off my projects, but it has other uses, too!

Most machine manufacturers I looked at sell some variation of edge stitch foot, which has a little metal bar in front to mark the centre. This isn't a standard foot; you're unlikely to find it included with your machine. However, finding an edge stitch foot is well worth the effort.
This post shows 10 things you can do with an edge stitch foot. Exciting!
This post shows 10 things you can do with an edge stitch foot. Exciting!
Here's the top view of my edge stitch foot. The metal bar on this particular Bernina foot is attached by a spring in the back, so it can handle different thicknesses of fabric, or no fabric at all if you're sewing on the edge.

Here's a front view, where you can see the thin metal guide.

So what can you do with my favourite foot?
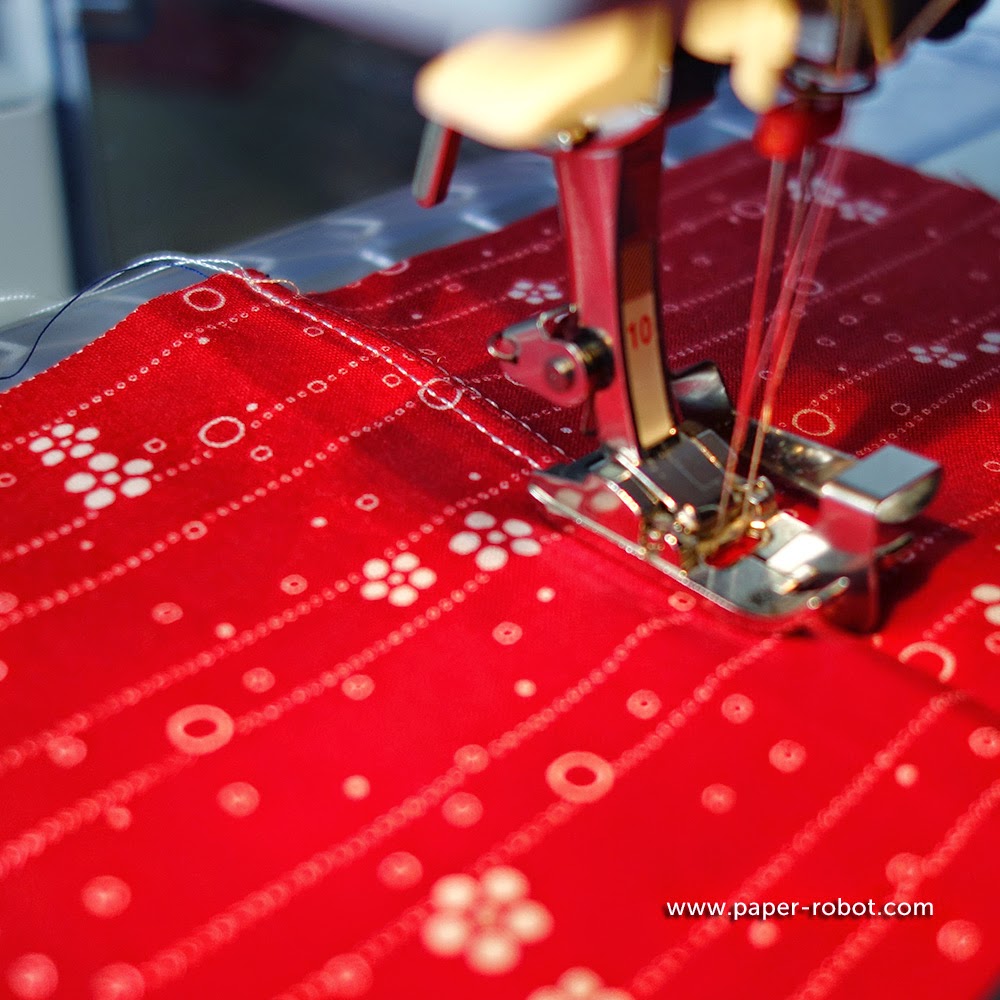
1. Edge Stitching (needle to the side)
By moving the needle over to one side, and placing the seam of your project against the guide (as in the image up top), you can get a very clean finish to your edges, like so:

Edge stitching has the added benefit of keeping your seam nice and tidy. I also use this to close up gaps which were left for turning. It's virtually indetectable in most cases, and much faster than slip-stitching by hand.
2. Parallel Stitching (needle to the side)
Once you've sewn along the edge, you can shift the fabric over and do another line, this time matching the metal guide with the first line of stitches. This gives you roughly parallel, decorative stitches.
Once you've sewn along the edge, you can shift the fabric over and do another line, this time matching the metal guide with the first line of stitches. This gives you roughly parallel, decorative stitches.

I say "roughly" because it requires some practice and patience, like most craft techniques.
3. Single pintucks (needle to the side)
Instead of sewing along the edge of your project, try folding your fabric and sewing along the fold line. Once you trim those threads, you'll have a tidy little pintuck, without even needing a twin needle or a pintucking foot.
Instead of sewing along the edge of your project, try folding your fabric and sewing along the fold line. Once you trim those threads, you'll have a tidy little pintuck, without even needing a twin needle or a pintucking foot.

Of course, I do have twin needles and I most definitely have (two!) pintucking feet. If I needed to do pintucks, I'd go with the specialty foot (are you surprised?), since they have a little more flexibility and a slightly better look, but the edge stitch foot has way more flexibility, and if you're looking to expand beyond your basic set, I'd start with that anyway.
4. Attaching trim (needle to the side)
The edge stitch foot makes it super easy to attach trim in the middle of your project, like so:
The edge stitch foot makes it super easy to attach trim in the middle of your project, like so:

To do this, line the trim up with the guide, rather than the fabric, and sew! I've used this method to attach webbing for bags, and it works wonders.
Pro tip: sewing in the same direction (e.g., top to bottom, bottom to top) on both sides will eliminate some of the puckering that you can see with this satin ribbon. Lots of pins or basting will help even more. You can sew to the left or to the right just by moving the needle and aligning the trim to the left or right of the guide.
Pro tip: sewing in the same direction (e.g., top to bottom, bottom to top) on both sides will eliminate some of the puckering that you can see with this satin ribbon. Lots of pins or basting will help even more. You can sew to the left or to the right just by moving the needle and aligning the trim to the left or right of the guide.
5. Parallel stitching (twin needle, needles in the centre)
A different kind of parallel stitching, but just as decorative, is to use a twin needle, and line the guide up with a seam.
This gets you perfectly parallel stitches, provided you don't get distracted and start veering away from the seam. That happens way more easily than you expect, but it's less frustrating than the previous edge stitching version.

You can't really do this along an edge, though, because the twin needle cannot be placed to the left or right of the guide. If you try, you'll just jam one of the needles into your foot, which can lead to a dull, unusable needle at best, and a broken needle projectile at worst.
6. Stitch in the ditch (needle in the middle)
"Stitch in the ditch" means you have an already sewn seam, and are sewing in said seam (the ditch), but your fabric is laying flat.

This is pretty common in patchwork quilting, where you have your piecework on top, some batting in the middle, and a lining on the bottom. These all need to be attached to one another, but maybe you don't want to quilt in between your seams? Stitch in the ditch is your answer.
I've also used it in garment construction, particularly for skirt waistband facings. In this case, you have a waistband at the top, and matching pieces of fabric sewn to it. This gives you a seam at the top, and not just some unfinished edge. Once you've edge stitched that top seam, you can stitch in the ditch for the seam that connects your waistband to your skirt. This keeps the facing from flying up inside.

(Gosh, I really messed up the colour in these few photos. I didn't think, when I was cutting up my scraps, just how RED this post would be.)
7. Appliques (needle in the middle, zig-zag)
For a definite patchwork look, you can use a zig-zag stitch to attach a piece of fabric to something else.

This is super simple; just remember to turn your work at the corners, with the needle down! Try it a few times with scrap fabric so you can get the hang of it.
This is super simple; just remember to turn your work at the corners, with the needle down! Try it a few times with scrap fabric so you can get the hang of it.

Patches aren't generally my style, but this is actually quite cute!
8. Finishing edges (needle in the middle, zig-zag)
Back in August, when I was geeking out about my new serger (which is STILL SO AWESOME AND I LOVE IT TO PIECES), I briefly mentioned ways to finish your seam allowances, to prevent fraying. You can use an edge stitch foot to zig-zag along the seam allowance, which is much more attractive than some random stitching on the inside.
Back in August, when I was geeking out about my new serger (which is STILL SO AWESOME AND I LOVE IT TO PIECES), I briefly mentioned ways to finish your seam allowances, to prevent fraying. You can use an edge stitch foot to zig-zag along the seam allowance, which is much more attractive than some random stitching on the inside.

It's nice to make it look clean, even though nobody is going to look inside your projects but you (and probably me, because I'm rude that way, but I wouldn't judge. I buy ready-to-wear all the time).
9. Joining clean edges (needle in the middle, zig-zag)
I recently discovered this use, but have honestly never thought about doing it myself. If you fold two pieces of fabric, you can use the edge stitch foot and zig-zag between them, joining them like so:
I recently discovered this use, but have honestly never thought about doing it myself. If you fold two pieces of fabric, you can use the edge stitch foot and zig-zag between them, joining them like so:

It's not my favourite look, to be honest, but I also read somewhere that it's apparently great for lace? I haven't got any lace around that I wanted to test out, but I'm a little dubious. Some further research is going to be necessary on that one, I think.

10. Corded edge
Last and probably least, you can apparently also use the edge stitch foot to attach cording and trim along the edge. I found some photos, but I'm even more dubious about this one. I did try it. It did not look good. I am not posting a photograph of that attempt, haha.
---
If you have an edge stitch foot, try it out! I bring that foot out of the cabinet for nearly every project. Check out this affiliate link if you want to explore edgestitch feet on Amazon
I still owe you a t-shirt stocking post, which is coming up! It's a little held up by a skirt project I'm working on this week, which is also going to be replacing this week's blag-a-bag. Blag-a-...skirt?
No comments:
Post a Comment